Thursday, December 10, 2015

How I Shot It: After the Rain

How I Shot It: After the Rain

This photo got a 1st Place in November’s Enchanted Lens Camera Club competition Group A Assigned Digital category, which was Motion Blur/Out of Focus, judged by Dana Foy.


Camera Info
GoPro Hero 3+ Black Edition
Lens: 15mm
Exposure mode: Hacked, explained below
Exposure: ISO 100, f 2.8, 2.7 seconds
White balance: Auto

Lighting
Ambient fluorescent, sodium, LED, halogen, incandescent

Other Gear
GoPro Suction Cup Mount
GoPro Waterproof Case
My car

Goal

To show motion, I wanted to do some night car photography, but not the typical taillights-on-a-highway scene. I figured that a a lot of entries would be that type of shot, so I wanted to kind of reverse the concept by having the car be the static object and the scenery in motion. Turns out, this one was the only car light trails shot entered, I think.

Method

I initially wanted the camera mounted on the hood, aimed at me with the lights and reflections all kind of pointing toward the center of the frame. 

I thought I could mount my tripod to the grill of the car with some cargo straps. I did some experiments with my tripod with the car was in the garage, and couldn’t come up with a way to secure it well enough to be confident that it would hold the camera securely.

I had a GoPro and a suction cup mount, but the GoPro has very limited exposure settings. I needed some long exposure times, and the GoPro is not designed to do that type of thing. So I hit the internet and found some stuff where people had hacked a GoPro to do long-exposure stuff. I wrote about it in my last post.

With the above hack installed on the memory card, I mounted the GoPro on the hood with the Suction Cup Mount. I set the camera to start taking pictures, and drove down to SR 550 in Bernalillo.

I returned home and pulled the pics off the GoPro. Turned out that they were boring.


The next night, I put the camera on the driver’s door of the car, way down low. This made me a little nervous, because if the camera fell off, there was a good chance I would run over it with the rear wheel, or it would bounce into oncoming traffic. It held on fine until I was making the turn into the driveway, where I heard it fall off onto the concrete. The waterproof case got scuffed up, but at least the lens window was undamaged. Whew!

Post-processing


During the run, the GoPro took about 250 pictures. I loaded them into Lightroom and picked the best ones. I settled on 3 that had the most interesting lights. I toyed around with the Basic sliders to recover blown highlights, lighten the shadows, and boost the vibrance and saturation to give some bright colors to liven up the images. Then I copied the settings from one picture to another.

Opening the 3 photos as layers in Photoshop, I ran the Auto Align Layers function. I tried a bunch of different transparency settings and opacity amounts to see what gave the most interesting arrangement. While doing this, I also tried arranging the layers in different ways. 

When I was happy with the general arrangement, I added layer masks to the top 2 layers, and masked out places with a soft brush. Most of the problems were areas where the brightest areas coincided, such as the headlights of oncoming cars. These highlights were very bright, so those got the most attention.


I then flattened and saved the file, returning to Lightroom. The only adjustment that made it into the final edit was taking the Blacks to +100. I tried sharpening the image, but it actually detracted from the image. I remembered that the assignment was to produce blur.

Analysis


It was a fun picture to make. And I learned that a GoPro can be hacked! 

I find it interesting what you can see in long exposures that you don’t see with the naked eye. LED signs produce very intense light, and they pulse rapidly. Fluorescent lights also pulse with the 60 Hertz cycle of the US electrical grid. You can see this effect in the top left quadrant of the photo if you look for the McDonald’s sign.  

You probably don’t think about it much when driving, but even on the smoothest pavement, a car’s suspension is constantly working. If you look closely, the wheel of my car is moving up and down a little bit.

What I like about the picture is that there is so little that is familiar and in sharp focus, but once you see the fender of the car and figure out what is going on, it all seems to fall in place and the rest makes sense. 

Technically, despite my work in Photoshop, there is still lost detail in the highlights. Pixel-peepers may howl at that, but in a photo like this, blown highlights might actually add to the impact of the photo as I think it imparts an energetic feeling. Besides, with the goal of “blur” in the assignment, detail must be inherently lost, anyway.

Tips
If you try this type of shot, make very sure that your camera is mounted securely. I drove at about 40 MPH while making this photo. 40 MPH doesn’t seem like it’s very fast when you’re driving a car, but imagine your camera on a tripod in a 40 MPH wind. And then factor for the additional bumping, vibration, and G-forces that your car endures while driving. If I were to do it again, I would add a safety string to the GoPro to keep it from hitting the ground if it were to fall off.

I would love to hear comments and/or questions!


Saturday, October 24, 2015

Hacking a GoPro Hero3+ Black to take long exposures

I wanted to make a photo for our photo club’s monthly assignment with a long exposure by attaching my GoPro Hero3+ Black on the hood of my car with the Suction Cup mount. 

The problem was that the Hero3+ Black (I’ll call it “H3+B” from here on) tries to shorten the exposure time as much as it can by increasing the ISO, which is the opposite of what I needed it to do. I wanted to keep the ISO low, and increase the shutter open time to a few seconds to get light smears.

I searched DuckDuckGo for a solution and found this page (https://gist.github.com/KonradIT/ce55b04ab4ad10592ebf/#file-autoexechack-md) by Konrad Iturbe. 

Konrad has worked out an autoexec.ash boot script that is copied to the top level of the MicroSD card  for the H3+B. He also lists a table of values that are put in the script at the X and Y values that determine the shutter speed in seconds.

How-To when using a Mac:

What you need:

GoPro Hero3+ Black. Some people have had some success with Hero3+ Silvers and Hero2’s as well, but I don’t own any of those. Some or all of these older cameras may need a modified version of the script.

A MicroSD card from SanDisk, Lexar, or Delkin. According to Konrad's site, not all cards can support this hack, but I wonder about that since I tried a Kingston 16GB card and it worked fine. Check Konrad’s site for a list of known working cards. I think the key issue that many people have is that the autoexec.ash file isn't saved properly in UNIX format.

A MicroSD card adapter, and a card reader of some type. If you have a MicroSD card, it should have come with an adapter to fit a standard-sized SD slot. Again, reports are that not all card readers seem to work properly. I’m using an old Griffin Simplifi from 2007. It works fine for me. I doubt that the card reader is much of a factor, but I've seen bizarre stuff happen with cheap hardware over the years. 

A text editor that can save the text file as UNIX format. This is VERY important! I’m on a Mac running OS X 10.11, and I tried TextEdit and BBEdit 10.5.13, neither of which worked no matter how I twiddled with the Save dialogs.

If the file is not in UNIX format, it will be ignored when the camera boots. Instead, I used nano, which is installed with all recent versions of Mac OS X. Worked like a champ, and it's free.

Here we go!

Step 1: Set the GoPro to have the power-on default mode to be the Single Still Image mode, which is the icon of just the camera, not the time-lapse one. Shut the camera off, and remove the SD card. Put the SD card in your computer.

Step 2: Open the Terminal program. It is in Applications > Utilities. A window like this will open.


Step 3: Type (or copy and paste) the following command into the Terminal window.

nano ~/Desktop/autoexec.ash


and press Return. This will start the nano editor and create an empty text file on your Desktop called autoexec.ash.

Step 4: Copy this code and paste it into nano in the Terminal window. 

t app appmode photo
sleep 1
t ia2 -ae still_exp P X Y
sleep 1
t app button shutter PR
sleep A
d:\autoexec.ash
REBOOT yes


Step 5: You will be editing lines 3 and 6. Using the arrow keys on the keyboard (nano doesn’t respond to mouse movements), navigate the blinking cursor up to line 3 and over to the P character. Delete the P, and enter the ISO you want the GoPro to use. I entered 100.

Step 6: Next, navigate to the X in the same line, and delete it. In its place, I entered 55, which translates to about 6 seconds of exposure time. 

Step 7: The Y value is supposed to be the lens aperture, but GoPros have fixed apertures, which is 2.8 on the H3+B. Delete the Y character, and enter the same value that you did for the X. For some reason, both the X and Y values need to be the same.

Step 8: Using the arrow keys, navigate down to line 6. Delete the A, and replace it with a value in seconds that you want between exposures. I used 9 seconds.

Except for saving the file, you’re done. Here’s what my nano window looks like.


Step 9: Check over your values and make sure you didn’t add any blank lines to the script. When ready, press Ctrl-X. The bottom of the nano window will read “Save modified buffer (ANSWERING "No" WILL DESTROY CHANGES) ?” Press Y, and then, if you are happy with the name of the file, press Return. This will save the file and close nano.

Step 10: Go back to the Finder, and drag the newly modified autoexec.ash file to the SD card. Put the file in the top (root) level of the SD card, like this: 


Step 11: Eject the SD card from your computer. Put the SD card in the GoPro and power it up. When the camera comes up, it will take one picture with your ISO and shutter speed changes, and then reboot the camera and take another picture. It will keep doing this until you power the camera off again.

Tips

The P value is the ISO setting. Use 100, 200, or 400 to get less noise in your images. 

The A value is the shot interval amount in seconds. In use, the actual time between shots seems to be longer than the value entered because there is some time added due to the script rebooting the GoPro. I think the time is from the moment when the exposure starts to the start of the reboot. If your exposure is 5 seconds, and A is set to 4 seconds, I’m not sure what would happen. Remember that the camera needs some amount of time to write the picture to the memory card. Also, if you want to stop the camera and the interval is too short, you might have a hard time getting the camera to stop. As I play with this, I’ll see if I can figure out what a minimal setting would be.

The X and Y values determine the shutter speed. Values range between 2 (8.5 seconds) and 1000 (0.000158328 seconds). Below is a table copied from Konrad’s site. In the right column, the Exposure Times are in European format, which uses commas as decimal points instead of the American style of using periods. So if you are in the US, read 8,5 as 8.5.


Value (number to write in hack file)Exposure Time (seconds)
28,5
57,7
157,3
207,1
256,9
306,8
396,4
406,3
456,2
506,1
755,3
855
954,7
994,6
1004,6
1303,9
1603,3
2002,7
2552
4001
5000,56
6000,33333
10000,000158328

If you don't want to go through editing autoexec.ash files, Edward Czajka has a collection of pre-configured files that you can download through DropBox. It's here: http://edwardczajka.blogspot.com/2015/06/long-time-lapse-exposures-with-gopro.html

How to return the camera to normal operation

There are two ways to get your camera back to it’s normal configuration. One way is to format the memory card while it’s in the camera. This will delete the autoexec.ash file, and it will also delete all your pictures on the card, too. So think carefully before doing this!

The other way is to delete or rename the autoexec.ash file from the memory card manually using your computer. I’ve read that some people with an Android phone and a compatible card reader have done this. 

Alternatively, and probably easiest, you could carry two memory cards, one with the autoexec.ash file, and another one without it. Switch out the cards in the camera as you need.

Will it damage the GoPro?

Probably not. The script seems to just direct the camera as to what to do at boot. But of course, this is a non-official hack, so if something goes wrong, don't blame me. 


Results

Here's a picture I tried. ISO 100, 3.3 seconds (X & Y setting of 160).
It's been cropped in Lightroom.


Friday, October 16, 2015

History has found us


A staffer from the popular TV show American Pickers contacted us about a month ago about some pictures of antique gas pumps we had taken on our first trip to New Mexico in 2010. We sent them a few, and they used them on this week’s show! If you want to watch the episode, it is currently available here:


It’s the episode entitled Like Father, Like Daughter. 

It will also re-air on the History Channel on Oct. 21 at 8:00 pm ET, and later that same night on Oct. 22 at 12:01 am ET, so set your DVR to record it.


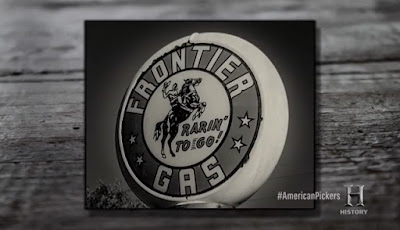
In the show, the stars Mike and Frank are interested in purchasing a Frontier Oil sign. As they negotiate, Mike has a voiceover with our pictures onscreen, talking about the history of Frontier.

The pictures only appear for a few seconds, but it was fun to see them on a TV show. 

We sent them color photos, and the editors at AP changed them to sepia and added other treatments.

Here’s one that we sent…


and what they did with it….


Some others….


They asked us how we wanted to be credited, and we just told them “just put copyright Todd Hakala” and “copyright Rozanne Hakala”, thinking that they would use the © symbol. But no, they did exactly what they were told!


Tuesday, September 22, 2015

My First Rodeo

I had never been to a rodeo before. Rozanne and I had been wanting to go to one since we moved to New Mexico, but something always seemed to interfere, schedule-wise. This year, we finally got our chance.

The nice thing about living in Albuquerque is that so much happens here, such as the New Mexico State Fair. Being a state fair in cowboy country, of course they have to feature a rodeo! And it was a good one. We enjoyed it so much, and we’ll be going to more.

We figured that we would be able to get up close to the rail to get some pictures, so we took our all-purpose 24-105mm zooms. We were wrong: All the seats near the front were reserved for VIPs, so we were seated about 8 rows back from the arena. I wonder who all the VIPs were that didn’t show up for the rodeo, since most of the up-close seats were empty for the whole evening.

Despite the poor vantage point, relatively slow lenses, and low light, I got a few decent pictures. None are print-worthy, but it was a fun experience nonetheless.

Here’s some pictures. All were taken with a Canon 5D Mark II, Canon 25-105mm L set at 105mm for most shots, Auto ISO (usually 3200), f4, 1/250 or so. All are very extreme crops.

Barrel racing requires a well-trained horse and a skilled rider to navigate a course in the shortest time. From what I’ve read, barrel racing at the professional level is limited to women.

As usual, you can click on the pictures to see larger versions....Enjoy! And don't forget to subscribe down at the bottom of the page.


Although there were many other events at the rodeo, we were too far away to get any good pictures. The highlight of the evening comes at the end, with bull riding. It’s very exciting, and dangerous for both the riders and handlers, more commonly known as rodeo clowns.


Few riders made it the entire 8 seconds on a bull to qualify for a score, but it was exciting to watch.


I was amazed at how energetic and agile the bulls were. Whenever I have seen bulls in the past, it was usually from a moving car and the bulls had their heads down and eating grass, which isn't particularly exciting. The rodeo changed my perception.


And it's dangerous! I thought this guy was going to have the bull come down on him with both rear hooves after he was bucked off. The bulls keep bucking and kicking even after the rider is laying on the ground.

Watch how the rodeo clown puts himself in harm's way to protect the rider. Everyone was okay in the end.


Friday, September 11, 2015

Happy and also proud

I am happy to announce that one of my photos won Second Place in the Urban category at the 2015 New Mexico State Fair photography competition! It marks a few "firsts" for me.

I've entered other online contests before, but this is the first "real" competition I have ever entered. The photos were judged by a panel of five persons, all professional photographers that also teach photography at various institutions in New Mexico.

The rules for my entry, which was at the Professional level (meaning that if I have ever earned any money from my photography, even a single penny, made me a "Professional") meant that my print had to framed and glassed. The other levels were Adult Amateur and Youth, which only had to be mounted and matted. Funny, I still don't feel like a Pro.

So it was my first experience getting a photo framed for competition. My first juried show. My first award.

By now, Gentle Reader, you are probably sick of waiting and are itching to see the photo that won. Without further delay, here it is. I call it Rise.

Rise by Todd Hakala

Blogger limits how big I can display it here, so here's a link to 500px where you can see it larger.

Comments by the judges, which I found interesting, were that the slight shadow to the left "wasn't necessary", and that it "screams Urban", which is good, because that was the category I put it in.

I also entered Hoodoo Factory in the Scenic category, and though it scored well enough to be in contention for a ribbon, it didn't win anything. I'm including it here for comparison.

Hoodoo Factory by Todd Hakala

Link to a larger version of Hoodoo Factory on 500px. 

Now that you know that Rise is a Second Place photo, you might be wondering what beat it for First Place. That turns out to be none other than my wife, Rozanne, with her photo Helix. That photo not only won First Place, but also Best of Show, which is quite an honor. She also earned an Honorable Mention for Penitente Morada. I'm very proud of her.

Both Rozanne and I are surprised at our success, being newbies at photo competitions. We are also happy that we purchased our first high-end photo printer that we think contributed to our success at the State Fair. We got an Epson SureColor P800 printer, which is an amazing machine. All of our submitted photos were printed on the P800.

Monday, March 9, 2015

Virga Bomb

Add another term to your weather vocabulary: Virga Bomb.

Recently we’ve heard about the polar vortex and the derecho. Now comes virga bomb.

Virga is from the Latin, meaning “twig” or “branch”. I first heard of virga when I moved to New Mexico in 2013. Virga is rain that falls from a cloud but evaporates before it hits the ground. It looks like vertical wispy trails under a cloud.


Over this past weekend, I heard about virga bombs on the TV news. So what are they?

When the rain falls from the cloud and evaporates, it cools the air under the cloud. Cool air is denser than warm air, so the colder air sinks. When conditions are right, the cold air can fall very rapidly, creating a microburst. When the microburst hits the ground, the air has nowhere to go except horizontally along the terrain, causing high, gusty winds.

And that’s a virga bomb!

Sunday, August 17, 2014

Got a new camera!

We got a new camera last week! Here's a video from the first week of ownership.


It's a DJI Phantom 2 Vision + (Plus).

This is my first "non-toy" radio control device. I'm amazed at how much technology has changed model aircraft since I was a kid.

The Phantom, or any quadcopter for that matter, would be very difficult to fly without the tiny gyroscope and flight control computer in it. Fortunately, the craft is amazingly easy to fly. It is easy to get over-confident with it, though. Even with all the fancy technology, crashing it is still a real possibility.

The Phantom also has a compass and a GPS receiver built into it. Both of those allow the aircraft to come to a fairly stable hover when both control sticks on the transmitter are released, provided it's not too windy. The GPS, if set correctly before flight, will allow the quad to fly itself back to the launch point if the transmitter signal is lost.

The flight computer also tracks how much energy is left in the battery and calculates how long it would take it to get back home before the battery is depleted. Once the battery reaches a certain discharge point, it will return to home automatically.

I like how smooth the video comes out. Watching it fly in a wind would make you think that the video would be herky-jerky, as the aircraft body often oscillates quite a bit. Thanks to the brushless 3-axis gimbal that DJI camera is mounted on, the video is quite smooth.

The only slightly disappointing part is how the camera tilt function works. The motion is very smooth, but starting and stopping the tilt is very sudden and mechanical looking. This is very obvious when watching the video on a computer.

The Phantom also has a video and telemetry downlink. The transmitter comes with a clamp to hold an iOS or Android smartphone. The free DJI Vision app displays the camera feed on the smartphone screen, enables you to change camera settings while the machine is flying, tilt the camera, take stills, and start or stop the video. Unlike a GoPro, the camera can't take still pictures while recording video.

The downlink video is pretty good even at 15 frames per second. I haven't tried any of the higher frame rates yet. The weakest part of the system is my iPhone 4s. Even when I turn the screen brightness up to 100%, the screen still gets washed out in the sun. Compounding the problem is the reflective screen of the iPhone. I'm currently looking for some way to shade the screen.

The telemetry sent back from the Phantom is interesting, but I have doubts about its accuracy. I have yet to get an accurate altitude even when the quad is on the ground. In one instance, the altitude meter indicated –20 ft, or underground.

Other things on the screen are the number of photos that can fit on the MicroSD card at the current time, how many GPS satellites the Phantom has contact with, Phantom battery level, WiFi range extender battery level, and relative WiFi signal strength.

The video and telemetry data are transmitted over a 2.4 GHz WiFi signal. The transmitter came with a WiFi range extender attached to it. Being on 2.4 GHz, though, means that the signal can be degraded by getting too close to a home WiFi base station. I have experienced the video feed freezing up on me a couple times so far, perhaps due to flying within range my neighbor's base station.

 Off to practice some more!